Accurate construction estimating starts with understanding the blueprint. Blueprints are more than drawings; they are a language of symbols, dimensions, and notes that convey everything about a building project. Whether you’re calculating material quantities, labor costs, or project timelines, reading blueprints correctly is critical.
This guide will teach you how to read and interpret construction blueprints for estimating purposes, helping you reduce errors, improve efficiency, and produce accurate bids.
1. Understanding the Purpose of Blueprints
Blueprints provide a detailed graphical representation of a building or structure. Estimators use them to:
- Identify dimensions of walls, doors, windows, and other elements.
- Calculate material quantities (concrete, steel, lumber, drywall, etc.).
- Determine labor requirements based on scope and complexity.
- Plan sequencing, logistics, and equipment needs.
Blueprints typically include:
- Floor plans – overhead view of rooms and layout.
- Elevations – vertical view of walls and exterior faces.
- Sections – cross-sectional cuts showing internal structure.
- Details – zoomed-in elements like staircases, trusses, or wall joints.
- Schedules – tables with information on doors, windows, finishes, or hardware.
2. Blueprint Symbols and Notations
Blueprints rely heavily on symbols to represent materials, fixtures, and systems. Familiarity with these symbols is essential for estimating.
Common Symbols for Estimating
| Category | Symbol Example | Meaning |
|---|---|---|
| Walls | Thick solid lines | Structural walls |
| Doors | Arc between lines | Swing direction of doors |
| Windows | Thin rectangle or double line | Window placement |
| Electrical | Circle with letter (e.g., L) | Light fixtures |
| Plumbing | Circle with P or triangle | Fixtures like sinks, toilets |
| HVAC | Duct lines with arrows | Airflow direction and ducts |
| Flooring | Hatching or shading | Material type (tile, wood, carpet) |
Tips:
- Always refer to the legend or key on the blueprint.
- Symbols can vary by architect or engineer — confirm before estimating.
3. Reading Scales and Dimensions
Blueprints are drawn to scale, meaning that measurements on paper correspond to real-world dimensions.
Common Scale Types
- Architectural scale: e.g., 1/4” = 1’0” (commonly used in residential drawings)
- Engineering scale: e.g., 1” = 20’ (commonly used for site or civil plans)
How to Read Scaled Dimensions
- Identify the scale listed on the blueprint.
- Use a scale ruler or digital measuring tool in software like PlanSwift or Bluebeam.
- Convert the measured length on paper to real-world dimensions using the scale.
Example:
- A wall measured as 2 inches on a 1/4”=1’-0” scale equals 8 feet in real life.
4. Identifying Structural Elements for Estimating
When estimating, certain elements are particularly important:
Walls and Partitions
- Load-bearing walls vs. non-load-bearing walls
- Materials (wood framing, steel studs, concrete)
- Lengths and heights for quantity takeoffs
Doors and Windows
- Count doors, windows, and sliding doors
- Include size, type, and hardware specifications
- Use window/door schedules for more accurate counts
Flooring and Finishes
- Area measurements from floor plans
- Material types: tile, hardwood, carpet
- Layered materials (subfloor + finish) affect material quantity
Roofing and Ceiling
- Roof pitch and dimensions from elevations
- Ceiling heights for labor and material calculations
- Specialty features like skylights or soffits
Mechanical, Electrical, and Plumbing (MEP)
- Identify fixtures and connections
- Use symbols and schedules for estimating quantities and labor
- Factor in additional installation costs for complex systems
5. Using Sections and Elevations
Sections and elevations provide 3D perspective on the project:
- Sections: Cross-sections of walls, floors, and roof assemblies
- Important for understanding materials in walls, insulation, and finishes
- Elevations: Exterior or interior faces of buildings
- Useful for calculating façade materials, windows, doors, and exterior finishes
Estimating Tip: Always cross-reference floor plans with sections and elevations to avoid missing hidden materials like wall cavities or structural supports.
6. Reading Notes and Specifications
Blueprints often include text notes and specifications:
- Notes indicate material types, installation methods, or special instructions
- Specifications cover technical requirements for materials, finishes, or codes
- Some blueprints include revision clouds indicating updated or changed elements
Estimating Tip: Notes often contain critical information that can affect cost — like upgraded finishes, structural reinforcements, or code requirements.
7. Estimating Quantities from Blueprints
Once you understand symbols, scales, and notes, you can calculate quantities:
Step-by-Step Estimating Workflow
- Review Entire Set of Drawings – Floor plans, elevations, sections, and MEP.
- Mark Takeoff Items – Identify every wall, door, window, fixture, and finish.
- Measure Dimensions – Use scale ruler or digital software for accurate lengths, areas, and counts.
- Assign Material & Labor Costs – Match each takeoff item with cost data.
- Sum Totals – Add up material, labor, equipment, and overhead for complete estimate.
8. Tips for Accurate Estimating from Blueprints
- Double-Check Scale and Units: Misreading a scale is a common source of errors.
- Use Layered Takeoffs in Software: Separate walls, doors, MEP, and finishes for clarity.
- Look for Hidden Details: Check elevations and sections for items not shown in floor plans.
- Account for Waste & Overages: Materials rarely install perfectly; include 5–10% extra.
- Review Revisions: Make sure you have the latest drawing set to avoid errors.
9. Using Digital Tools to Aid Blueprint Reading
Modern estimating software simplifies blueprint reading:
- PlanSwift: Click to measure walls, areas, and counts. Auto-calculate material quantities.
- Bluebeam Revu: Use digital markups and Dynamic Fill for irregular shapes.
- Togal.AI: AI-assisted recognition of walls, doors, and fixtures for automatic takeoff.
Pro Tip: Combining traditional blueprint knowledge with software ensures accuracy and efficiency.
10. Common Mistakes to Avoid
| Mistake | How to Avoid |
|---|---|
| Ignoring scale differences | Always check scale on each sheet |
| Missing symbols or notes | Review legends and text notes carefully |
| Overlooking hidden materials | Cross-reference sections and elevations |
| Not accounting for revisions | Verify drawing version before estimating |
| Assuming dimensions | Measure all elements; don’t guess |
11. Conclusion
Reading construction blueprints is a foundational skill for estimators. By mastering symbols, scales, dimensions, and notes, you can:
- Accurately calculate material and labor quantities
- Reduce errors and avoid costly rework
- Produce reliable bids and project forecasts
Combining blueprint literacy with digital estimating software like PlanSwift, Bluebeam, or Togal.AI further enhances accuracy, speed, and confidence in every construction project.
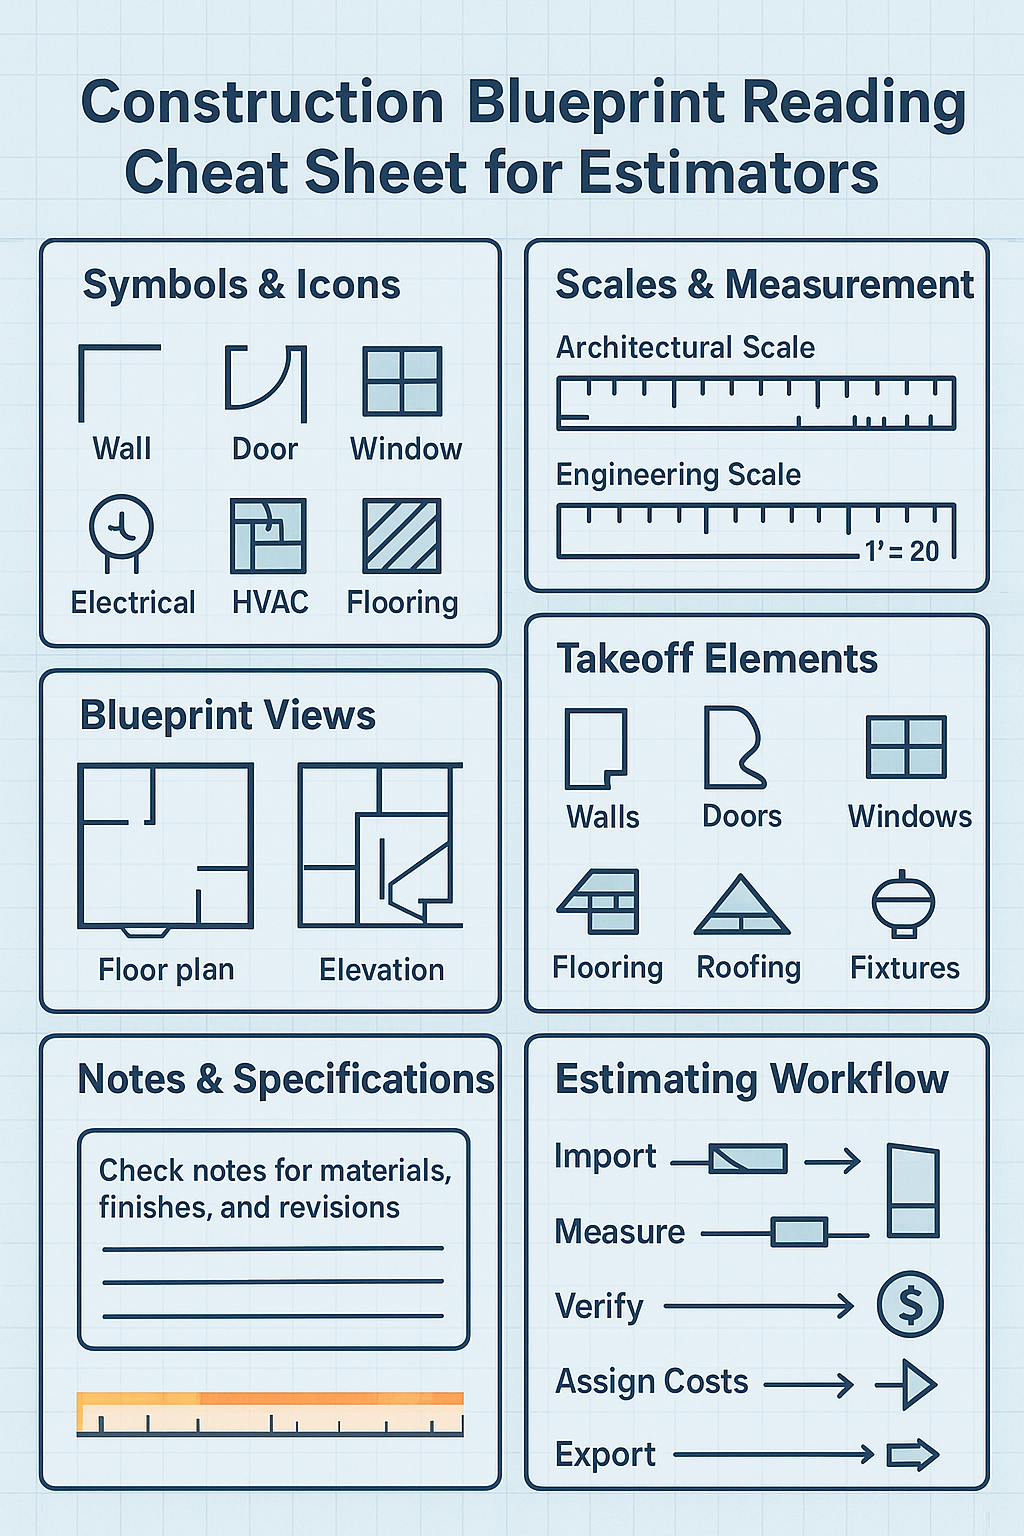
Construction Blueprint Reading Cheat Sheet for Estimators